Microphone Selection
Picking the right microphone for classical instruments | EP 03

HOW TO CHOOSE THE BEST MICROPHONE FOR RECORDING ORCHESTRAL INSTRUMENTS
In this video you’ll learn:
- The difference between smartphone mics and professional external microphones
- How microphone distance changes direct sound vs. room ambience
- Characteristics of large‑ and small‑diaphragm condenser microphones
- When to choose cardioid vs. omnidirectional polar patterns
- The basics of mono vs. stereo recording
- How to set up a spaced pair (A/B) for a natural stereo image
[00:00] In this tutorial series, we get into the essentials of how to make you and your orchestral instrument look and sound better.
In this episode, we take a closer look at some microphone options for your recording.
We’ll show you the difference between the built-in microphone of a smartphone and a professional external microphone in various positions, and we’ll talk about the difference between a mono recording and a stereo setup to enhance the experience.
[00:32] The easiest way to record your audio is to use the built-in microphone of your smartphone, tablet, or digital camera.
However, these microphones are often noisy, lack clarity and frequency response, and they use compression and automatic gain correction.
They are also always positioned where your camera is — which, for most instruments, is not the ideal position to capture their full sound.
[01:01] If you want the option to place the microphone in a position that is favorable for your instrument, and you want to control the balance between the direct sound and the room sound and reflections, an external microphone is the right choice for you.
Here are some options.
[01:20] A large-diaphragm condenser microphone can add a more flattering quality to your instrument.
With a cardioid polar pattern, it rejects sound from the back and focuses more on the sound in front of it.
A good microphone will have little self-noise, a high dynamic range, and an even frequency response.
For this tutorial, I chose the Neumann TLM 102, which is a very affordable professional microphone that is extremely easy to use and can capture the authentic character of any instruments.
Let’s hear how this compares to the built-in microphone of a smartphone.
[01:37] (Instrument plays)
[01:55] The closer you move the microphone to the instrument, the more dry and direct it will sound. The further you pull the microphone away, the more you will hear the reflections and reverb of the room. Try to find the right bland for your performance and your instrument.
[02:15] (Instrument plays)
[02:42] (Instrument plays)
A small-diaphragm condenser microphone can give you a very authentic sound that captures the room without any coloration. The Neumann KM 184, like the TLM 102, has a cardioid pickup pattern, that rejects sound from the back. The Neumann KM 183 has a so-called omnipattern, which means it captures sound from all directions, including the room and its reflections, and it is also able to capture even the lowest bass frequencies.
[03:20] If you place these two microphones in the same position, the KM 183 will pick up more of the room, but you can always move this microphone closer to your instrument, which will also give you a nice level boost.
[03:47] If you record with just one microphone, you will end up with a mono recording, with a sound being right in the center between your two speakers or in your headphones. Any natural reverb picked up by the microphone will also be just in the center, behind the direct sound.
[04:10] For a more realistic experience, you can use two microphones to record your performance. There are various recording techniques for stereo recording.
The microphone technique we used in this tutorial is called a spaced pair, also known as A/B recording.
[04:18] We mount the two microphones in parallel on a stereo bar, with a spacing between 25 and 30 centimeters.
We have the choice between the omnidirectional Neumann KM 183 for a more spacious feeling, or the Neumann KM 184 with its cardioid pickup pattern for a more focused sound, which will be a good choice in very lively space.
[04:55] This will produce an image of a soloist that wider than a single mono spot microphone can achieve, but it is still appropriately restricted in width. to make the sound less reverberant, you can move the microphones closer to the source.
Let’s compare our mono recording with the stereo recording.
[00:05:15] (Instrument plays)
[05:35] Take your time to find the right position for your microphones, as sometimes moving them a couple of centimeters can make a big difference.
Thank you.
[00:05:50] (Music)
FAQs | EP 03
Large- and small-diaphragm condenser microphones are popular choices because they offer high detail, low noise, and natural sound reproduction.
Cardioid microphones reduce sound from the rear, while omnidirectional microphones capture sound from all directions, including room ambience.
Moving the microphone closer creates a drier, more direct sound, while greater distance captures more room reflections and reverb.
Mono uses a single microphone, while stereo uses two microphones to create a wider and more realistic sound image.
An A/B setup uses two microphones spaced apart, typically 25-30 cm, to create a natural stereo image with width and depth.
Step-by-Step Guide: How to Choose the right Microphone for recording classical Instruments
1. Why microphone choice matters
Using an external microphone gives you control over sound quality, placement, and the balance between direct sound and room ambience.
2. Large‑Diaphragm Condenser Microphones
With a cardioid pattern, they focus on the sound in front while reducing noise from behind. Key qualities of a good condenser microphone include low self-noise, high dynamic range, and an even frequency response.
- Closer = drier, more direct sound
- Further = more room, reverb, reflections
Each orchestral instrument requires finding the right balance between detail and ambience.
3. Small‑Diaphragm Condenser Microphones
- Neumann KM 184 (cardioid): rejects sound from the back, focused and clear
- Neumann KM 183 (omnidirectional): captures sound from all directions, including room ambience and very low bass frequencies
|
Cardioid Pattern
 |
Omnidirectional Pattern
 |
If you’d like to take a closer look at the microphones featured in this tutorial, explore the models mentioned above:
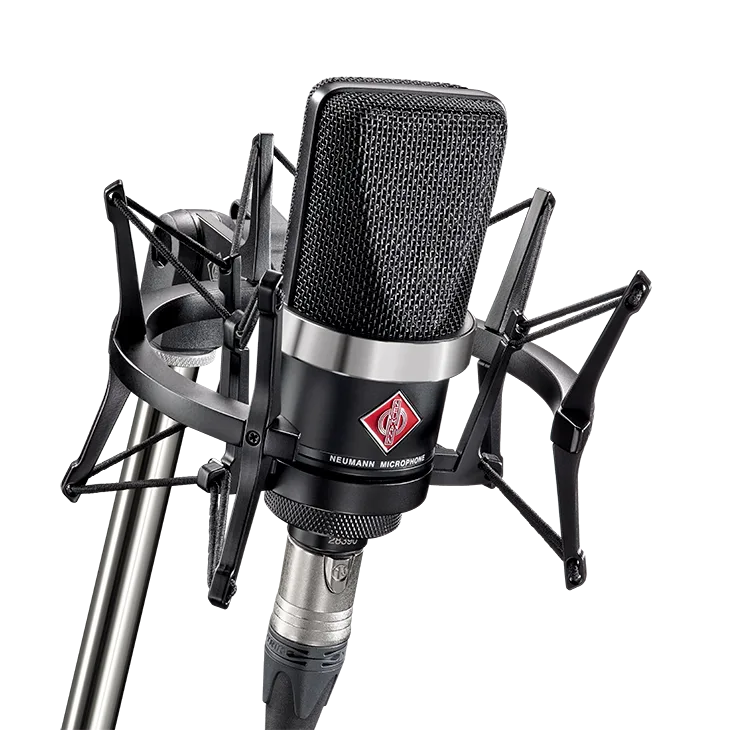


4. Mono vs. Stereo Recording
- Single microphone
- Sound is centered between speakers
- Room reverb stays centered behind the instrument
- Multiple Microphones
- More realistic and spacious listening experience
- Captures width and depth
Stereo Setup: Spaced Pair (A/B)
In the video, this technique is demonstrated using: the Neumann KM 183 (omnidirectional) and the Neumann KM 184 (cardioid). This configuration produces a wider, more natural stereo image than a single mono microphone can achieve: ideal for classical and orchestral instrument recordings.
If the room sounds too reverberant, you can simply move the microphones closer to the instrument to capture a more focused, less ambient sound.

6. Fine‑tuning your recording
Take the time to experiment with placement, comparing the directness of the instrument to the amount of room ambience.
Ready to start recording?
- In Episode 4, we’ll provide you with some tips and secrets on how to record Strings.
- Discover more guides and expert tips in our Knowledge Hub.
- Follow us on Instagram to stay updated on our daily news and behind‑the‑scenes insights!


